This Treatment is due by Friday December 20th.
1. What is your theme for your final project?Example: My theme project is Old America, Photomerge Seattle, or Man v. Nature.
2. Why did you choose this as your theme? What is interesting about this theme? Be specific. 2-3 sentences
3. What type of locations will you choose to shoot your pictures? Why?
Keep in mind that you will need to leave campus and most likely leave
Shoreline. Please give three or four examples.
4. What type of pictures do you hope to take? Action, portrait,
landscape etc? A good photo essay will have a variety. Give me some
specific examples and how they relate to your theme. Yes, I want you to
attempt to describe pictures you haven't even taken yet. Visualize...
5. What kind of composition will you focus on in your pictures? You
will need at least five composition elements (not counting
rule-of-thirds). Yes, again I want to know what you are attempting before you shoot. What will you try that you haven't done before?
5b. How will your pictures convey emotion, either from your subject or
from the viewer of the pictures? Why will an audience really enjoy these
pictures?
6. How much work will be done at school and how much away from school?
7. If you don't have a car, how will you make sure you get to your locations? Can your parents help? How about public transit?
8. This project should showcase everything you have learned in Digital
Photography. How will you ensure this happens? What Photoshop
adjustment techniques will you use? Please give three or four examples.
9. Is there anything you are unclear about in terms of composition or shot styles and angles etc? This is the time to ask.
10. What type of camera or Photoshop experimentation will you try? HDR?
Photomerge pictures? Aperture adjustments? Shutter Speed work?
Again, Send the treatment to my email account.
Please CC at least one of your parents or guardians on the email so
they know they extent of this project. They may need to help with
transportation etc.
Thursday, December 19, 2013
Wednesday, December 18, 2013
Final Project Photography
Photo 1 Final Project
Digital Photo: The Final Project
Photo Essay Requirements:
• First pick a general theme. For example, you might pick America, Democracy, or Responsibility. You will shoot photographs centered on this central theme. This may include camera experimentation like shutter speeds, HDR, aperture adjustments, or photomerges.
• Use what you've learned about photographic composition, lighting, color, lines, texture and use your camera to make a statement. Each individual photo will be graded accordingly. It is imperative you showcase your ability to shoot many angles of shots with many levels of camera composition (Review composition elements and types of shots if necessary).
• Your photographs should make both a visual and emotional/political/critical/intellectual statement. Your photo essay should contain at least 9 photographs. Below each picture you will also describe the composition elements used on each photo, what you did to adjust the picture, the photo settings used, why you picked this picture, and where you took the picture.
• Your photo essay should be something unique, new, and your own view of your selected theme.
A one-page reflection is also required. In this paper you need describe what you learned during your project. What did you learn about your subject, Photoshop, and photography in general. What was easy and difficult about your project? What would you do differently if you did it again? Finally, how far along do you think you have come as a photographer this semester?
• You can shoot B & W, Color, or both. It’s your artistic choice.
• You may digitally alter your photos as necessary in Photoshop. You should use all of the landscape style, portrait style, and Instagram styles as needed.
• Your pictures should be printed out either 3*5 or 4*6, two to three pictures per page with the exception of one photo that will be printed at 8.5 *11.
• Projects should be turned in on poster board or in a binder with written with the written reflection attached. Look at examples at the front of the room.
• You will also be dropping this assignment in the Staff server so that we may view each project in front of the class.
Timeline:
Winter Break: You will shoot (at least) Two Full Contact Sheets
Monday January 6: Adjustment Day
Wednesday January 8: Shooting Day 3
Friday January 10: Adjustment Day/Writing
Weekend Homework: Shooting Day 4
Monday January 13: Adjustment/Writing Day
Wednesday January 15: Optional Shooting Day if needed, Adjustment, Writing, and Printing Day
Friday January 17: Adjustment, Writing, and Printing Day
January 22:Projects are due at the beginning of the period.
Sunday, December 15, 2013
Portrait Homework
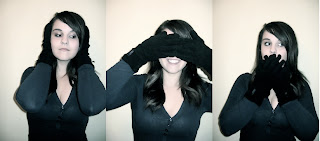
Your homework assignment is to shoot another set of Portraits. If possible, I encourage you to use relatives either much younger or much older than you. (At this point your should have plenty of "teenager" portraits).
Just like last week, I encourage you to use props, various clothing and costume options, and more than one location if possible.
Also, please remember to USE YOUR PORTRAIT HINT notes. If you attempt to shoot at least 15 or 16 of the hints I think you will do very well on the assignment.
Due date: Monday December 15th
Thursday, December 12, 2013
Wednesday, December 04, 2013
Digital Photography Portrait Assignment
Digital Photography: Portrait Assignment
You will shoot portraits over the next week on Friday December 6th and Wednesday December 11th
One
day you will shoot at school using the lights in the studio and the
other day you will
shoot off-campus at a predetermined location.
You will shoot AT LEAST
24 pictures of your subject each day (most of you will shoot between 50
and 75 pictures.
You can, and probably should, take pictures on the
weekend as well.
1. Find two interesting human subjects. The people you choose should WANT to be in the picture and they should be willing to cooperate. I highly suggest working with people in this class.
2. Talk to your subject. What type of portraits do you want to create? Use colors or lighting to create a concept for your portrait. Costumes or uniforms work great. Imaginary ideas are OK. Choose an interesting setting based on your concept.
3. Change angles between shots. Shoot at least 24 pictures of each subject.
4. Use props if they will help the audience learn something about the subject.
5. Vary the lighting. Use filters, flashlights, lamps, or multiple lights to enhance your picture. Use the different lighting techniques that you will read about in class (see above).
6. Encourage different emotional looks. Pretend you are Austin Powers taking pictures. Tell your subject they are "groovy".
7. Having your subjects "pose" in action is just fine.
8. Most importantly for this assignment don't forget your compostion rules. Use framing, leading lines, rule of thirds, color contrast etc. to enhance your photo. Fill the frame.
Portrait HintsPart 1
Portrait Hints Part 2
More Hints
Even more hints


Here is a list of the different types of portraits photos you will turn in:
Finally, you will turn in your best picture as well.
Lighting!!!1. Find two interesting human subjects. The people you choose should WANT to be in the picture and they should be willing to cooperate. I highly suggest working with people in this class.
2. Talk to your subject. What type of portraits do you want to create? Use colors or lighting to create a concept for your portrait. Costumes or uniforms work great. Imaginary ideas are OK. Choose an interesting setting based on your concept.
3. Change angles between shots. Shoot at least 24 pictures of each subject.
4. Use props if they will help the audience learn something about the subject.
5. Vary the lighting. Use filters, flashlights, lamps, or multiple lights to enhance your picture. Use the different lighting techniques that you will read about in class (see above).
6. Encourage different emotional looks. Pretend you are Austin Powers taking pictures. Tell your subject they are "groovy".
7. Having your subjects "pose" in action is just fine.
8. Most importantly for this assignment don't forget your compostion rules. Use framing, leading lines, rule of thirds, color contrast etc. to enhance your photo. Fill the frame.
Portrait HintsPart 1
Portrait Hints Part 2
More Hints
Even more hints


Here is a list of the different types of portraits photos you will turn in:
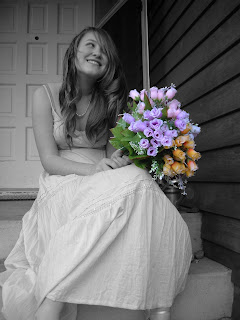
- A Vignette Photo
- A Grayscale Method Photo
- A One Item Kept in Color Photo
- A selective Focus Photo
- A minimally adjusted photo
- One WHACKY anything goes portrait (change the colors, use the liquefy tool, and make this as unique and interesting as you can)
Finally, you will turn in your best picture as well.

http://mrstorydigiphoto.blogspot.com/2011/12/different-lighting-techniques.html
- Creating Killer Headshots: The Cheap Way! - David Griffin
- A quick start guide to the one light setup - David Griffin
- Back Lighting - Studio Lighting Setup - StudioLighting.net
- Paramount (Butterfly) Lighting - Studio Lighting Setup - StudioLighting.net
- Multiple Light Portrait Setup Hints - David E. Price
- Short Lighting - Studio Lighting Setup - StudioLighting.net
- Broad Lighting - Studio Lighting Setup - StudioLighting.net
Tuesday, November 19, 2013
Export From Premiere
Exporting From Adobe Premiere Pro

Format=Quicktime
Preset=HD 1080i 29.97
Video Codec=H.264
Check the Use Maximum Render Quality Box

Your Project Saves within the Adobe Folder in your Documents section on the Computer
Next, drop your video in the Vidstore Server. Don't forget to use the Naming Convention: 2-mitchellt-Sequence.
Go
Connect to server
Vidstore.shorelineschools.org
Name: scvideo
Password: Outback23
Sc Video classes
Period 2 or 4
Friday, November 15, 2013
Abstract Editing
Abstract editing...
Vivid Color:
http://photoshoptutorials.ws/photoshop-tutorials/photo-effects/vivid-glow.html
Enhance Saturation:
http://www.tutorialized.com/view/tutorial/The-Best-Technique-to-Enhance-Saturation/33311
More Vivid Colors, that look natural:
http://www.tutorialized.com/view/tutorial/Naturally-Vivid-Colors/32530
selective focus:
http://www.youtube.com/watch?v=bSZ_Pqh63dM
vignette:
http://rockysnapper.blogspot.com/2007/12/creating-vignettes-in-photoshop-cs3.html
Vibrant Color
http://www.youtube.com/watch?v=eKeY2jBaPZw
Dreamy Glow
http://www.youtube.com/watch?v=DkiXrRw8Obg
Beams of Light
http://www.youtube.com/watch?v=m8PpbgU-BQQ
Abstract Photography HInts
-->
Abstract Photography Hints
1. Look for subjects that showcase lines, shape,
and form.
2. Look for subjects that you don’t normally see in pictures.
3. Look up, look down, and look very close at
subjects. Macro photography can lead to interesting abstract photography.
4. Look for subjects that showcase pattern and repetition.
5. Look for interesting color combinations.
6. Look for reflections.
7. Look for pictures that showcase light in a
unique way.
8. Play around with focus. Selective focus and
soft focus pictures are OK in abstract photography.
9. Practice and experiment with paints, oils,
food, and other abjects.
10.
Throw away the photography rules and have fun!
Wednesday, November 13, 2013
Abstract Picture Assignment
Abstract Picture Assignment
You will take pictures nearby school today.Friday the 15th will be a shooting period.
Please look at the links below for examples of abstract work. What is an abstract photo? What makes abstract photos interesting?
Googled
Earth Photography
Photo.net
40 Great Examples of Abstract Photography
70 Great Examples


For this next assignment I want you to throw out all of the "rules" we've discussed in class this semester. This is your chance to be as creative as possible. I would recommend looking for patterns, colors, and shapes when deciding on pictures to take. Also try to take pictures of things you don't normally see in pictures.
Turning in Your Photomerge Pictures
Today you will turn in Photomerge CS3.
You will then merge all of your new pictures.
Next you will edit all of your merged pictures in Photoshop.
At 11:15 you will turn in your best five Photomerges on a Contact Sheet. This Contact Sheet must contain at least one picture from each day of shooting.
You will also turn in your best Photomerge for grading. I will discuss printing the Photomerges in class.
Photomerge Grading:
1. Photomerege needs to look like one picture. Colors and objects in pictures should blend together perfectly without any errors.
2. Photomerege should showcase rule of thirds and foreground, mind-ground, and background subjects just like a landscape photo.
3. Photomerge should showcase an interesting location. Picture should look like something you would see in a calendar or framed on a wall.
Tuesday, November 05, 2013
How To Import Your Stop Motion Pictures Into Adobe Premiere

First, make sure your pictures are organized by day (make a separate folder for each day's pictures).
Select on just one of your pictures that you took for this project. Right click 'Get Info.' You'll notice that the dimensions are listed under more info.
Write these dimensions down.


Open Adobe Premiere. Create a new project (File>New>Project) and name it Stop Motion. Click OK.
Select Digital SLR>1080p>DLSR 1080p30 and name your sequence. DO NOT CLICK OK YET.


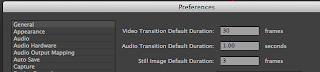
Go to Adobe Premiere>Preferences in the upper left hand corner
and change the Still Image Default Duration to 3. (If your pictures play
too slow after changing these settings try changing them to 2).

Next, go to File>Import and your picture folders. Note: import each day of photos in their own folders. DO NOT MIX THE PHOTOS.


Best Images in Action Sports November 2013

http://xgames.espn.go.com/gallery/9895410/best-images-action-sports-november-2013
Click link above to browse through these pictures.
Thursday, October 31, 2013
Photomerge Assignment


Your assignment over the next five to six days is to take multiple landscape panorama style photomerges. Take a picture and then move the camera slightly up or sideways to take another "connected" image. Basically you combine smaller pictures to make one larger picture.
Use a tripod if possible. Remember to manual adjust white balance or select something like "cloudy" or "sunny" on your camera.
Here is how you connect multiple pictures in Photoshop.
To set up a new Photomerge composition:
Do one of the following:
Choose File > Automate > Photomerge.
In the File Browser, select the images you want to use and then choose Automate > Photomerge from the File Browser menu bar
In the dialog box, choose an option from the Use pop-up menu:
- Files to generate the Photomerge composition using individual files.
- Folders to use all the images stored in a folder to create the Photomerge composition. The files in the folder appear in the dialog box.
- Open Files to use the image files you have open in Photoshop.
Then edit your picture as you need.
Here is a tutorial you can use to get you going.
http://www.youtube.com/watch?v=qrNI-gAuI5s
Tentative schedule
Friday: Practice at school up by the track,the front of the school or Hamlin. Take five different photomerges comprised of 3-5 pictures each.
Return to class at 11:30.
Merge your pictures in Photoshop using the directions above.
Weekend Homework: Go to one landscape location and shoot five different photomerges. This means you will shoot about 15-20 pictures
Monday: editing
Wednesday: shooting day, go to an AWESOME landscape location to take more pictures

Wednesday, October 30, 2013
Action Photo Editing
Please select your twelve best action photos.
These pictures should show faces, be 95% in focus, fill the frame, and showcase interesting angles and composition.
Eight of these photos need to be from your SC club, sport, or event pictures.
Crop, adjust, and color correct all pictures.
Edit two pictures into Grayscale.
Edit two pictures using Selective Focus.
Edit one picture using one-item kept in color.
Edit the other seven pictures in what ever manner you see fit.
Turn in your twelve adjusted photos and call them Action Adjusted.
Turn in your best SC action picture for printing. Call it Best Action for printing.
If you took pictures for Swimming, Football, Cheer, or Flags please create a folder with your best, in-focus pictures and turn them into Ms. Johnson's Drop Box on the Staff Server. Please let Ms. Johnson and the yearbook staff know that your pictures are in the Drop Box.
Tuesday, October 29, 2013
Digital Photo: Are you caught up?
Have you turned in Action CS1 and Action CS2?
Did you shoot 50 action pictures of a SC sport, club , or group?
Did you shoot 50 action pictures of a SC sport, club , or group?
Stop Motion Assignment
You will have two full class periods to shoot your assignment using my digital cameras. You will edit your videos in Adobe Premiere and add sound effects and music.
http://www.youtube.com/watch?v=AJzU3NjDikY
http://www.youtube.com/watch?v=MtbQ4J3RfQ8&feature=related
http://www.youtube.com/watch?v=2_HXUhShhmY&feature=related
http://www.youtube.com/watch?v=DKWdSCt4jGE
http://www.youtube.com/watch?v=qBjLW5_dGAM
http://www.youtube.com/watch?v=BpWM0FNPZSs&feature=related
http://www.youtube.com/watch?v=o2pvO-FEqq4&feature=related
http://www.youtube.com/watch?v=5m23bL9AqB0&feature=related
http://www.youtube.com/watch?v=cYhhfHYZa5s&feature=related
Stop Motion Pre-Production
Please get in your groups and start planning your production.
1. Please use TEXT EDIT and turn in the following information in the STAFF server:
- Group Member names
- A four to five sentence description of your animation project.
- Please tell me what special "tricks" you will create to make your animation look interesting. What will your characters do that they can't do in real life?
- Also, let me know if you are using props or if the characters are wearing costumes. Who will wear what outfits?
- Most importantly please tell me the story from beginning to end.
- What type of music will you use? Why?
- What kind of sound effects will you add?
Each video will need:
1. Fade In/Out
2. Titles
3. Credits
4. Music and sound effects
Tuesday, October 15, 2013
Action Script 2.0: Stops and Mouse Control
Button:
http://www.youtube.com/watch?v=NLP7A9IYptU
Action Script 2.0
http://www.youtube.com/watch?v=PdvPEaoU7tg&feature=related
Action Script 2.0
http://www.youtube.com/watch?v=Q-QkWaY9y1o&feature=related
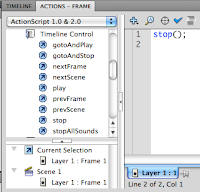
To create a STOP action script on the TIMELINE do the following:
1. Create a STOP layer on your animation timeline.
2. Control click and select Actions.
3. Under TIMELINE CONTROL in the upper left hand corner double click STOP.
To create ACTION SCRIPT for your button do the following:
1. Click the frame that your button appears in the timeline (make sure your button is on it's own layer).
2. Select directly on your button you have created down in the work area (not on the timeline).
3. Control Click>Actions
4. Under MOVIE CLIP CONTROL select ON and then RELEASE


http://www.youtube.com/watch?v=NLP7A9IYptU
Action Script 2.0
http://www.youtube.com/watch?v=PdvPEaoU7tg&feature=related
Action Script 2.0
http://www.youtube.com/watch?v=Q-QkWaY9y1o&feature=related
1. Create a STOP layer on your animation timeline.
2. Control click and select Actions.
3. Under TIMELINE CONTROL in the upper left hand corner double click STOP.

To create ACTION SCRIPT for your button do the following:
1. Click the frame that your button appears in the timeline (make sure your button is on it's own layer).
2. Select directly on your button you have created down in the work area (not on the timeline).
3. Control Click>Actions
4. Under MOVIE CLIP CONTROL select ON and then RELEASE

5. Move the cursor to the second line
6. Under TIMELINE CONTROL select GOTO AND PLAY and then type in the
frame where you want the button to transport the gamer player on the
timeline.

Note: at the bottom of the Action Script commands under Current Selection your button should be selected under current selection:

Monday, October 14, 2013
Manual Settings Class Assignment 2
1.Panning
You
should shoot 10-12 SUCCESSFUL panning style pictures using shutter speeds of around
1/20-1/60. Shoot just like the motorcross photographer suggested.
Suggested
activities to shoot: someone running across the field, someone doing back
handsprings or other gymnastic moves, anyone playing catch with a football or
baseball, and hackysack etc.
2.
Regular Action Shooting
Then
shoot 10-12 pictures of moving subjects using traditional fast shutter speeds
(usually 1/250-1/2000).
Have your subjects repeat the same action over and over.
Suggested activities to shoot: someone running across the field, someone doing back handsprings or other gymnastic moves, anyone playing catch with a football or baseball, and hackysack etc.
Have your subjects repeat the same action over and over.
Suggested activities to shoot: someone running across the field, someone doing back handsprings or other gymnastic moves, anyone playing catch with a football or baseball, and hackysack etc.
3. Depth
of Field Practice
Put the
camera in AV (aperture mode).
Shoot 10
Shots of the exact same subject from the exact same angle.
Adjust
the Aperture from low to high between each shot.
I would
suggest shooting a flower or tree with something else in the background.
You will
turn in three Contact Sheets at the end of the period named Panning, Action, and Aperture.
Wednesday, October 09, 2013
Photo 1: Aperture and Shutter Speed
Manual Adjustments:Aperture and Shutter Speed
http://www.picturecorrect.com/photographytips/208/aperture_fstops_camera_settings.htm
http://en.wikipedia.org/wiki/Aperture
http://en.wikipedia.org/wiki/F-number
F-Stops and Shutter Speed Hints
Please take detailed notes in your own words on the top two reading assignment. You will using the material you learn this week on the cameras.
Camera simulator:
http://www.photonhead.com/simcam/shutteraperture.php
http://www.kamerasimulator.se/eng/?page_id=2
http://dryreading.com/camera/index.html
htthttp://camerasim.com/camera-simulator/
Grayscale Adjustment Assignment
First, adjust all of your pictures into the various grayscale methods we have discussed in class. Start with the man-made shadow pictures you shot over the last couple of days.
When you are done you are going to turn in your best 20 pictures in a Contact Sheet called Grayscale Adjusted. Please make sure you have all adjustment methods included you must have at least two man-made shadow pictures.
The
adjustment methods: Basic Black and White (BBW), Calculations Method
(CM), Lightness Channel (LC), Ansel Adams(AA), Duotone (DUO), and Basic
Channel Mixer (BCM).
Please save and name each picture with the appropriate adjustment method abbreviation (BBW or CM etc.)
Finally, turn in your Best Grayscale picture as a .jpg file.

When you are done you are going to turn in your best 20 pictures in a Contact Sheet called Grayscale Adjusted. Please make sure you have all adjustment methods included you must have at least two man-made shadow pictures.
Please save and name each picture with the appropriate adjustment method abbreviation (BBW or CM etc.)
Finally, turn in your Best Grayscale picture as a .jpg file.
Monday, October 07, 2013
Choose Your Own Adventure Animation Assignment
CHOOSE YOUR OWN ADVENTURE ASSIGNMENT:
For this project you will be creating an adventure of some sorts that pauses periodically and gives the viewer a choice in where the story goes, thus a "choose your own adventure" tale! Your movie must contain:
* 8 Buttons
* goto and play
* stop
* up, over, down, hit states
* no stick figures
*multiple motion and shape tweens
* movie clips
* at least three instances of sound, sound should FILL your animation
At least three places where decisions need to be made
Please answer the questions below in Text Edit and drop the responses into the Staff Server>Mitchell>Classes>Period 2 or 4.
* Who are the characters? List at least two.
Where does the story take place?List precise location with details.
* What is the main story from beginning to end? What is the main character trying to do?
* What are the options in the choose your own adventure? What are the outcomes?
* How will your animation be more interesting and better looking than your last project?
Tuesday, October 01, 2013
SCNN Commercials: Export your Animation Project and Turn It In To the Vidstore Server
Exporting From Flash to Quicktime
File>Export>Export Movie>Quicktime
Save it using the naming convention. Save it in your movies folder.Change the Store temporary file to disc.

Next, log onto to Vidstore.shorelineschools.org and drop it in the period 2 or 4 folder.
- Click on your desktop background.
- Go
- Connect To Server
- Vidstore
- name:scvideo
- password:Outback23
- SC Video Classes
- Drop the Quicktime file into the 2nd or 4th period folder.
Wednesday, September 25, 2013
Grayscale: Patterns and Shadows
Digital Photo 1: Grayscale: Pattern and Shadow Assignment


Your assignment over the next two weeks is to shoot 24 pictures involving man-made shadows and 24 other images involving lightness/darkness relationships with a focus on patterns. 48 pictures total.
- Contact Sheet 1 is due next Wednesday the 2nd.
- Friday the 4th is an off-campus shooting day. Contact Sheet 2 is due at the end of the period Friday.
- Students have homework over the weekend and need to shoot one more Contact Sheet of Shadow and Pattern pictures.
Monday, September 23, 2013
Landcape Editing
-->
10 Best Landscape Pictures: All Pictures Should Look "Real"
- 1 Black and White (Grayscale)
- 1 Selective Focus
- 1 One-Item Kept in Color
- 7 Adjust the best you can
You will create a 10
picture contact Sheet called “Landcapes Adjusted.”
You will also send in your
best picture as a separate jpeg called “Best Landscape.”
Due Wednesday at 10:45
Landscape Grading Information:
Landscape Grading Information:
·
Is a wide shot with a
combination of trees, water, mountains, and other natural elements?
·
Does it have a
foreground, mid-ground, and background?
·
Is the entire picture
in focus (large Depth of Field)
·
Is it an INTERESTING
subject?
·
Is the horizon line
in the upper or lower third?
Monday, September 16, 2013
SCNN Commerical
Your next assignment will be a 15-25 second SCNN commercial for
anything school related. This could include a dance, a game, a club, an
event, or anything else. Content must be related to the specific
school related item.
All animation should look sharp and detailed.
Use school colors where appropriate.
Your animation needs to include:
First step: Commercial Treatment
You will write a detailed commercial treatment and send it to the coach or advisor of your club/activity/sport etc. You will ask for their permission to make a commercial and also for suggestions. You will also send me a copy (CC) of this email.
List of advisors:
http://learn.shorelineschools.org/shorecrest/sasb/index.php#list_of_clubs
School event Calendar
Treatment questions you must answer in COMPLETE sentences.
All animation should look sharp and detailed.
Use school colors where appropriate.
Your animation needs to include:
- Music AND sound effects throughout
- Keyframe animation
- Shape tween
- Two Motion Tween
- Two Movie Clips
- Text that says either "SCNN" or the information for the school club, group, or event
- Voices created by you using Garageband or other programs
First step: Commercial Treatment
You will write a detailed commercial treatment and send it to the coach or advisor of your club/activity/sport etc. You will ask for their permission to make a commercial and also for suggestions. You will also send me a copy (CC) of this email.
List of advisors:
http://learn.shorelineschools.org/shorecrest/sasb/index.php#list_of_clubs
School event Calendar
Treatment questions you must answer in COMPLETE sentences.
- What group or activity have you selected as your subject?
- Why did you select this group and why do you think you can make an interesting commercial for this group?
- What is your original concept? How are you going to SELL your subject?
- What will your tag line be? It needs to be something catchy and memorable.
- What kind of music will you use in the background?
- Please email the advisor or coach of your commercial subject ask permission to create a commercial using your concept. Include me on this email.
Thursday, September 12, 2013
Landscape Homework Over the Weekend
 Take notes on the material covered in the link below. USE YOUR NOTES as a resource when you shoot your landscape shots.
11 Landscape Hints

Your homework this weekend is to shoot landscape pictures.
You will shoot at least 24 pictures from at least two separate locations.
You may shoot horizontal and vertical landscape pictures.
Please do not center the horizon line and try to show something in the foreground, mid-ground, and background.
Pictures are due at the beginning of the period Monday.

Subscribe to:
Posts (Atom)