5/21 and 5/22 Turn in HDR. Also, send me your best pictures for the art show. We will matte these in class. Finally, complete and turn in your final project treatment.
5/26 and 5/27 All Day shooting for Final Project. Final Project Contact Sheet 1 due at the end of the period.
5/28 and 5/29 All Day shooting Day EXCEPT for seniors who skipped on 5/26. Seniors who skip must use class time to turn in photos and manipulate pictures. Shooting will be completed as home work.
6/1 Final Project Contact Sheet 2 is Due. All Day to edit/manipulate photos.
6/2 and 6/3 Editing and Printing. Final Project Contact Sheet 3 due at the beginning of the period.
6/4 and 6/5 Editing and Print All Day
6/8 No school.
6/9 and 6/10 Final Project Due For Seniors. Turn in all pictures used to STAFF folder period 5 and 6. Seniors will present project to class. Note: Final project will not be graded unless all 3 contact sheets are turned in.
6/11 and 6/12 Project Due For Underclassmen.
Thursday, May 21, 2009
Photo Essay Treatment
Photo Essay Treatment
Please answer the following questions in complete sentences.
1. What is your theme for your final project?Example: My theme project is Old America.
2. Why did you choose this as your theme? Be specific. 1-2 sentences
3. What type of locations will you choose to shoot your pictures? Why? Keep in mind that you will need to leave campus and most likely leave Shoreline.
4. What type of pictures do you hope to take? Action, portrait, landscape etc? A good photo essay will have a variety.
5. What kind of composition will you focus on in your pictures? You will need at least five composition elements (not counting rule-of-thirds). Yes, I want to know what you are attempting before you shoot.
5b. How will your pictures convey emotion, either from your subject or from the viewer of the pictures?
6. How much work will be done at school and how much away from school?
7. If you don't have a car, how will you make sure you get to your locations? Can your parents help? How about public transit?
8. This project should showcase everything you have learned in Digital Photography. How will you ensure this happens? What adjustment techniques will you use?
9. Is there anything you are unclear about in terms of composition or shot styles and angles etc? This is the time to ask.
10. What type of camera or Photoshop experimentation will you try? HDR? Photomerge pictures? Aperture adjustments?
Please Answer these questions in detail(compete sentences)and send these questions to my staff folder, period five and six.
Next, please copy these questions to your email. Send the treatment to my email account. Please CC at least one of your parents or guardians on the email so they know they extent of this project. They may need to help with transportation.
The Photo Essay (Final Project)
Special Note: Seniors have one less class period to complete this assignment.
Assignment Requirements:
• First pick a general theme. For example, you might pick America, Democracy, or Responsibility. You will shoot photographs centered on this central theme. This may include camera experimentation like shutter speeds, HDR, aperture adjustments, or photomerges.
• Use what you've learned about photographic composition, lighting, color, lines, texture and use your camera to make a statement. Each individual photo will be graded accordingly. It is imperative you showcase your ability to shoot many angles of shots with many levels of camera composition (Review composition elements and types of shots if necessary).
• Your photographs should make both a visual and emotional/political/critical/intellectual statement. Your photo essay should contain at least 9 photographs. Below each picture you will also describe the composition elements used on each photo, what you did to adjust the picture, the photo settings used, why you picked this picture, and where you took the picture.
• Your photo essay should be something unique, new, and your own view of your selected theme.
A one-page reflection is also required. In this paper you need describe what you learned during your project. What did you learn about your subject, Photoshop, and photography in general. What was easy and difficult about your project? What would you do differently if you did it again? Finally, how far along do you think you have come as a photographer this semester?
• You can shoot B & W, Color, or both. It’s your artistic choice.
• You may digitally alter your photos as necessary in Photoshop.
• Your pictures should be printed out either 3*5 or 4*6, two to three pictures per page with the exception of one photo that will be printed at 8.5 *11.
• Projects should be turned in on poster board with written with the written reflection attached. Look at examples at the front of the room.
• You will also be dropping this assignment in my drop box so that we may view each project in front of the class.
Monday, May 18, 2009
HDR Assignement
HDR MERGE ASSIGNMENT
You will take a total of four sets of HDR pictures between today and Thursday/Friday. Each HDR Merge should have at least four different pictures (all with different shutter or aperture settings).
You will have class time on Tuesday/Wednesday so please bring your cameras. The rest of the pictures will be taken on your own time. I would like everyone to get at least one sunset or sun rise picture.
I recommend adjusting the shutter speed only or using full manual mode when using my cameras.
When you use your own cameras to get HDR pictures please adjust the different pre-selected settings to change light. For example, you could select snow, beach, cloudy, and sunny to get four different amounts of light into your camera. (These pre-selected settings adjust the aperture and shutter speed for you automatically).
HDR Pictures
Step-By-Step HDR Instruction
Here
In the instructions above they suggest you change your shutter speed instead of aperture. I will recommend you try both. I have created HDR pics adjustingthe aperture only adjustments and have had good results.
HDR Pictures


Each of these pictures is actually three pictures combined, each with a different aperture setting.
Friday, May 15, 2009
Stop Motion 2 Requirements and Treatment
1. 750-1000 pictures at least
2. An interesting animation where things that normally can't happen, happen.
3. Fade In/Out
4. Titles and Credits
5. Music throughout the whole video.
6. Multiple Sound effects
7. Two Separate Locations in your video (two scenes).
8. At least two objects must be animated.
9. Three storyboard sheets must be turned in per group.
10. Titles must be created in Live Type.
Treatment Questions (please use Text Edit and drop into the STAFF server):
1. What are you going to animate?
2. What is the story from beginning, middle, to end? Be specific. I want to know exactly what happens.
3. What will these objects do that will be interesting to watch?
4. What kind of music will you use?
5. What kind of sound effects will you use to enhance your video?
6.
Friday, May 08, 2009
Stop Motion Animation Requirements
1. 500-750 pictures at least
2. An interesting animation where things that normally can't happen, happen.
3. Fade In/Out
4. Titles and Credits
5. Music throughout the whole video.
6. Multiple Sound effects
You will export to Quicktime when you are finished and drop the video into the Vidstore server.
2. An interesting animation where things that normally can't happen, happen.
3. Fade In/Out
4. Titles and Credits
5. Music throughout the whole video.
6. Multiple Sound effects
You will export to Quicktime when you are finished and drop the video into the Vidstore server.
Tuesday, May 05, 2009
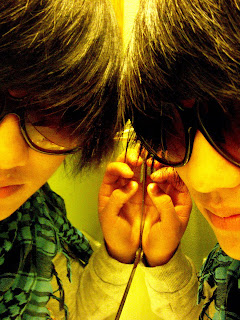
Studio Lighting Assignment
Studio Lighting!!! Your task is to shoot some interesting , creative and unique portraits using the studio lights.
Remember the different lighting techniques demonstrated in class. Use the lights to add emotion, feeling, or interesting shadows to your images.
Try to think out of the box, manipulate the image with Manual settings on the camera, blur motion, stop action, take tons of pics, and have FUN! Shoot for 1/2 the period in groups of 3 to 6 per light station.
Everyone should shoot their own photo session. Take turns as each others subjects. Shoot a minimum of 12 pictures per photographer. We will then edit them and make one fantastic using your photoshop skills.
Lighting Styles
http://www.fodors.com/focus/focselect.cfm?catid=7
- Creating Killer Headshots: The Cheap Way! - David Griffin
- A quick start guide to the one light setup - David Griffin
- Back Lighting - Studio Lighting Setup - StudioLighting.net
- Paramount (Butterfly) Lighting - Studio Lighting Setup - StudioLighting.net
- Multiple Light Portrait Setup Hints - David E. Price
- Short Lighting - Studio Lighting Setup - StudioLighting.net
- Broad Lighting - Studio Lighting Setup - StudioLighting.net


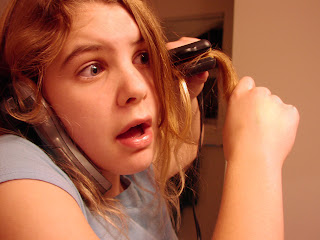
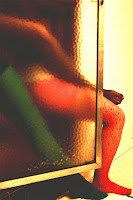
Portait Assignment
You will shoot portraits during the same time frame as the studio lighting assignment. You can have Thurs/Fri and Tues/Wed to work on these assignments during class. One day you will shoot at school using the lights and the other day you will shoot off-campus. You can, and probably should, take pictures on the weekend as well.
1. Find two interesting human subjects. The people you choose should WANT to be in the picture and they should be willing to cooperate.
2. Talk to your subject. Use colors or lighting to create a concept for your portrait. Costumes or uniforms work great. Imaginary ideas are OK. Choose an interesting setting based on your concept.
3. Change angles between shots. Shoot at least 24 pictures of each subject.
4. Use props if they will help the audience learn something about the subject.
5. Vary the lighting. Use filters, flashlights, lamps, or multiple lights to enhance your picture. Use the different lighting techniques that you will read about in class (see above).
6. Encourage different emotional looks. Pretend you are Austin Powers taking pictures. Tell your subject they are "groovy".
7. Having your subjects "pose" in action is just fine.
8. Most importantly for this assignment don't forget your compostion rules. Use framing, leading lines, rule of thirds, color contrast etc. to enhance your photo. Fill the frame.
Portrait Hints
More Hints
Even more hints

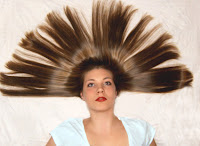
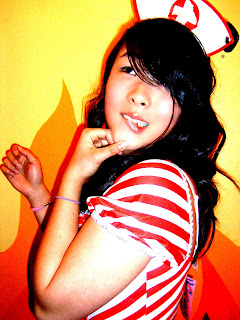
Here is a list of the different types of portraits photos you will turn in:
Finally, you will turn in your best picture as well.
1. Find two interesting human subjects. The people you choose should WANT to be in the picture and they should be willing to cooperate.
2. Talk to your subject. Use colors or lighting to create a concept for your portrait. Costumes or uniforms work great. Imaginary ideas are OK. Choose an interesting setting based on your concept.
3. Change angles between shots. Shoot at least 24 pictures of each subject.
4. Use props if they will help the audience learn something about the subject.
5. Vary the lighting. Use filters, flashlights, lamps, or multiple lights to enhance your picture. Use the different lighting techniques that you will read about in class (see above).
6. Encourage different emotional looks. Pretend you are Austin Powers taking pictures. Tell your subject they are "groovy".
7. Having your subjects "pose" in action is just fine.
8. Most importantly for this assignment don't forget your compostion rules. Use framing, leading lines, rule of thirds, color contrast etc. to enhance your photo. Fill the frame.
Portrait Hints
More Hints
Even more hints


Here is a list of the different types of portraits photos you will turn in:
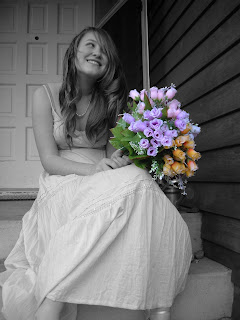
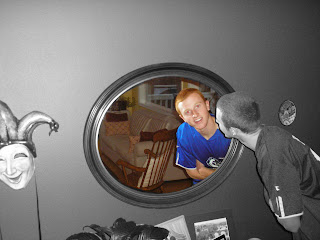
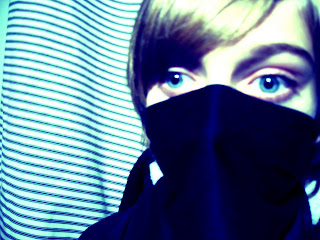
- A Vignette Photo
- A Grayscale Method Photo
- A One Item Kept in Color Photo
- A selective Focus Photo
- A minimally adjusted photo
- One WHACKY anything goes portrait (change the colors, use the liquefy tool, and make this as unique and interesting as you can)
Finally, you will turn in your best picture as well.

Friday, May 01, 2009
Getting Started in Final Cut Pro
- Import Photos
- Put the photos in a folder and then onto the server for your classmates
- Grab Photos of the server
- Open Final Cut Pro
- Drag Pictures into the clip bin (upper left hand corner)
- Drag Pictures into timeline
- Change the duration of the clips: highlight all of the clips, right click, select duration, and change the speed of the clips to 00:00:05 or 00:00:04. You decide on the speed.
- Rendering: Apple R= Render Red and Control R=Render Green
- Select your music.
- Select your sound effects.
- Drag all sounds into clip bin.
Subscribe to:
Posts (Atom)